Month: March 2015

Tracker for Understanding Bouncing Ball Problem

I’ve used the open-source Tracker software, a video analysis and modeling tool built for use in Physics education, for both my IP3 and JC1 classes this year. Thanks to Mr Wee Loo Kang and his team for enthusiastically introducing this software to the physics teachers of Singapore.

For the IP3 cohort, students were tasked to analyse the movement of any sports-related projectile and to relate the variations in displacement, velocity and acceleration to one another in both dimensions. This was a direct transfer task for the topic of two-dimensional kinematics that they were taught in class. Attempts to explain these variations using the idea of forces were encouraged as well, even though that topic has not be formally introduced yet.

For my JC1 class, I explained the specific example of the bouncing ball using the software, which was useful to show the variation in vertical displacement, velocity and acceleration synchronously with the positions of the ball. I used the resources in the Singapore Tracker Digital Library, search for the following directories: 02_newtonianmechanics_2kinematics > trz > Balldropbounce4x.trk.
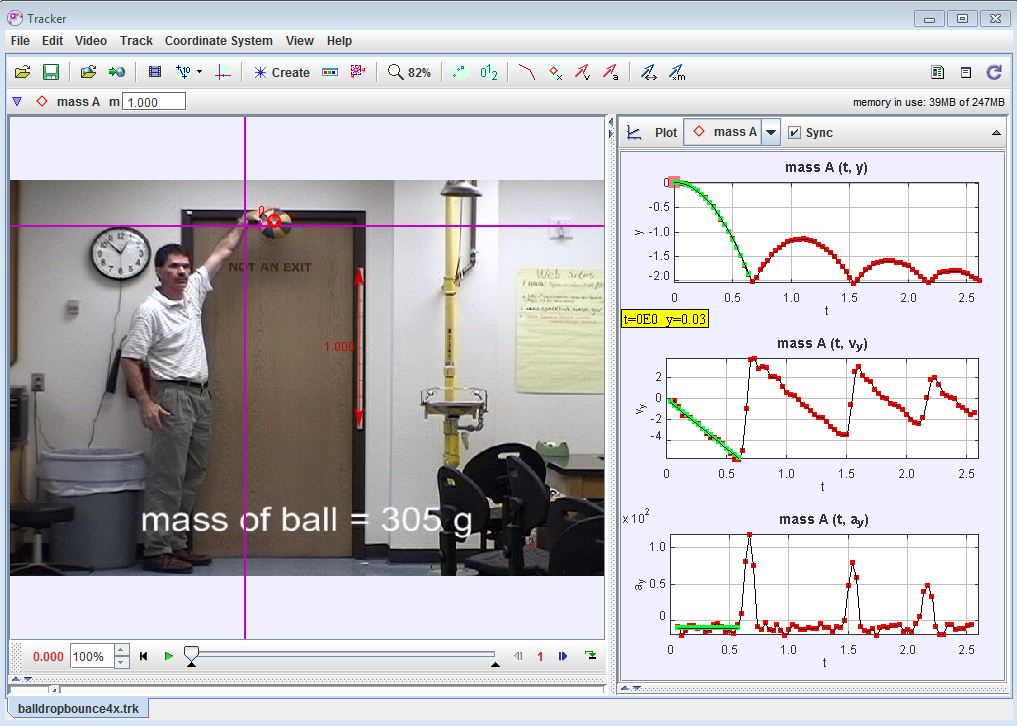
Use of Tracker to explain the bouncing ball graphs

It was easier for students to compare the three stages of the movement, namely
Stage A: the way up,
Stage B: the bounce (during which the ball is in contact with the ground)
Stage C: and the way down.

A series of guiding questions such as the following will be useful:

  1. Is there a difference between the vertical accelerations in stages A and C?
  2. What do the gradients in the velocity time graph for stages A, B and C represent?
  3. Identify the turning point of the ball in all 3 graphs. Notice that the acceleration remains at about 10 m s-2.
  4. How would the graphs look like if the coordinate system / sign convention is changed such that the displacement is defined as zero at the floor and upward is taken to be positive? The effect of this change can be shown by dragging the axes on the video (the two perpendicular purple lines) to the bottom and rotating the horizontal axis 180o; by dragging the short purple line near the intersection.
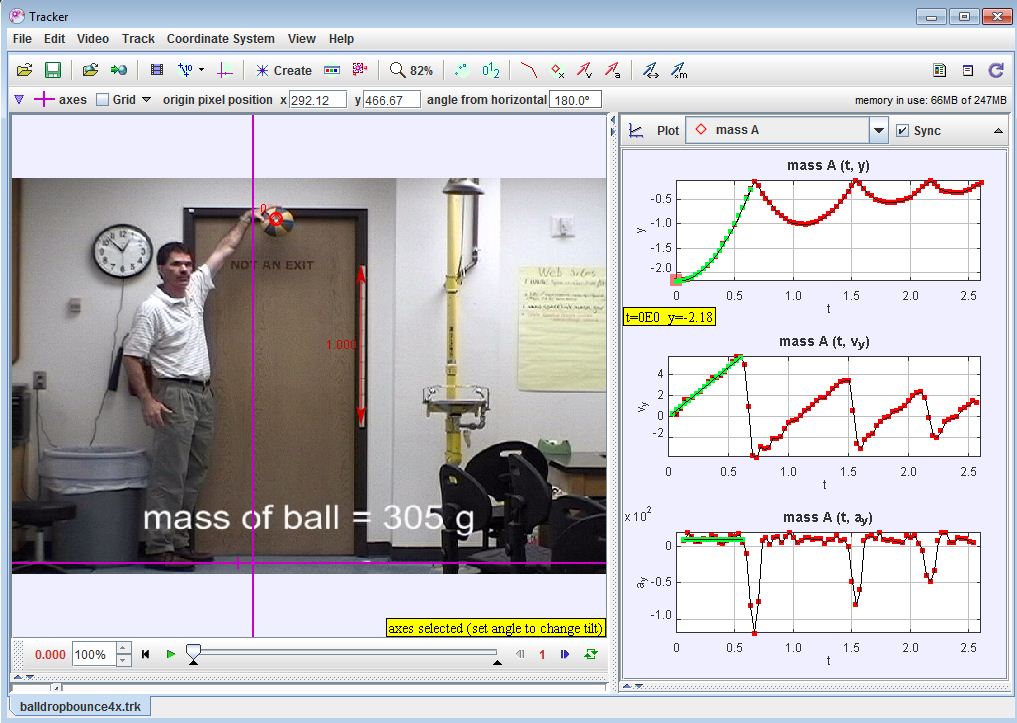
Graphs with different coordinate system defined.

The following video (sorry, no audio) shows the steps to take to do all the above. Just pause it at any point and rewind if you didn’t catch what I did.
8 Steps to Ace that Planning Question

The Planning Question is the last question on Paper 2 of the 9646 H2 Physics paper in the Singapore-Cambridge GCE A-Levels. It carries 12 marks out of 72 in the paper, which lasts 1 hr 45 min. Based on the principle where ratio of marks should be roughly equal to ratio of time allocated, the question should take about 17.5 minutes to complete typically. However the reality is that students tend to spend too much time on the theory questions and more so on the data analysis question which precedes the planning question, leaving insufficient time to properly answer what is arguably the most important question in the paper.

Physics Flipped Classroom and Thinking Routines

2nd Anglican High School National Symposium
Sharing by Mr Cheah Chien Lead. Mdm Hidayah from AHS

  • Flipped classroom for heat capacity (videos – asked students to search for videos, slides), refraction (applets + ws) and electrostatics (notes + thinking routine)
  • Thinking Routine used is Red Light, Yellow Light, Green Light.
  • Brought up scores for test groups after using thinking routine.
  • VARK Comparison suggests Aural and ? learners benefit

Examples of thinking routines

Elevator Physics

In a recent IP3 class on Newton’s 2nd Law, the students were presented the “Elevator Problem” based on the THINK Cycle approach – a version of inquiry-based learning that was started in Temasek Junior College, Singapore.

The “Elevator Problem” is a physics phenomenon observed in an everyday experience that students can relate to quite easily. It is presented to our IP3 (K9 students) right after the introduction of Newton’s 2nd Law, with the students having a good understanding of the forces of weight and normal contact as well as what makes a resultant force.

TRIGGER

The THINK Cycle kicks off with a Trigger: a problem or phenomenon for which students have to solve or explain. In the “Elevator Problem”, the Trigger is the observation that as I stand on a bathroom scale in a lift going from one floor to another, the reading on the scale changes in such a way:

  1. When the lift starts moving, the reading on the scale increases momentarily.
  2. For most of the journey, the reading is constant.
  3. When the lift is stopping, the reading on the scale decreases momentarily

The video below (taken by myself) shows what happens:

The students are supposed to work in groups to explain this observation and hence, to deduce whether the elevator is on its way up or down.

HARNESS

In the Harness stage of the THINK Cycle, students would work in groups to answer some guiding questions to help them arrive at a conclusion:

  1. What are the forces acting on the boy?
  2. Which of these forces are constant and which can change?
  3. How does the motion of the lift affect the changing force?
  4. What force is the weighing scale showing?

I find that providing students with a small portable whiteboard or a few pieces of rough paper is necessary for them to represent their ideas in diagram form, especially when the objectives of this activity is best achieved with the help of free-body diagrams.

INVESTIGATE

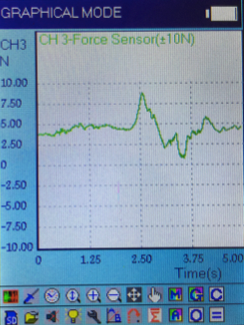
After coming up with a hypothesis based on their discussions, they will then seek to verify their hypothesis. Task number 2, which is for students to determine whether the elevator is going up or down, can be tested by hanging a 500 g mass on a force meter attached to a datalogger. We use the Addestation aMixer in our school, which is a handy portable datalogger with a plug-and-play range of user-friendly sensors. It gives us a graph that looks like that shown below when the mass is being pulled upwards, thus confirming that the movement of the elevator is also upward.

Variation of tension with time as the mass is pulled upwards.

The initial increase in tension acting on the mass is similar to that of the normal contact force on the man standing on the bathroom scale on the elevator. This is because both systems are accelerating upward.

The graph looks rather haphazard as the pulling is done manually and over a small height. By the time one pulls the mass up, he will have to decelerate already, which explains the dip in tension that follows right after the peak. Hence, we are unable to observe a stage where the tension is equal to weight, as we did for the scale in the elevator.

Nevertheless, students should be able to appreciate that a rise followed by a drop is observed for a mass being pulled upward.

NETWORK

For the sake of checking what the students have learnt collaboratively, each group is tasked to explain their observation and results on a A2-sized poster, with half the group staying at their own posters to answer questions while the other half going around to study the results from other groups. Their roles can be reversed after some time.

KNOW

In the final stage of our activity, the teacher will address the class and point out the common misconceptions that arose during the class discussions. For instance, many students are unaware that the upward force acting on the person standing on a weighing scale is the normal contact force and not the gravitational pull. This requires the teacher to introduce the terms “apparent weight” and “true weight” and making a distinction between the two.