Here are the steps to solving a problem involving Newton’s 2nd law.
Step 1: Draw a free body diagram – where possible, sketch a free body diagram to represent:
the body isolated from other objects
the forces acting on the body (ignore all internal forces) along the line of motion.
the direction of acceleration.
Step 2: Write down the equation: $$F_{net}=ma$$
Step 3: Add up the forces on the left-hand side of the equation, making sure that forces acting opposite to the direction of acceleration are subtracted.
Step 4: Solve the equation for the unknown.
For example,
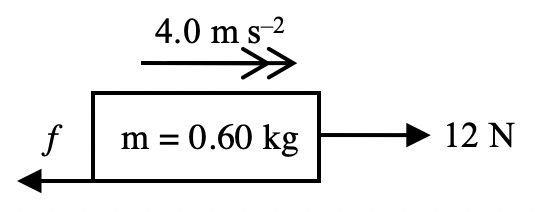
A horizontal force of 12 N is applied to a wooden block of mass 0.60 kg on a rough horizontal surface, and the block accelerates at 4.0 m s-2. What is the magnitude of the frictional force acting on the block?
I am using this post as a way to document my brief plans for tomorrow’s Google Meet lecture with the LOA students as well as to park the links to the resources and tools that I intend to use for easy retrieval.
Instruction Objectives:
apply the principle of moments to new situations or to solve related problems.
show an understanding that, when there is no resultant force and no resultant torque, a system is in equilibrium.
use a vector triangle to represent forces in equilibrium.
*derive, from the definitions of pressure and density, the equation ?=??ℎ.
*solve problems using the equation ?=??ℎ.
*show an understanding of the origin of the force of upthrust acting on a body in a fluid.
Activity 1: Find CG of ruler demonstration
Having shown them the demonstration last week, I will explain the reason why one can find the CG this way:
As I move the fingers inward, there is friction between the ruler and my finger. This friction depends on the normal contact force as $f=\mu N$.
Drawing the free-body diagram of the ruler, there are two normal contact forces acting on the ruler by my fingers. The sum of these two upward forces must be equal to the weight of the ruler. These forces vary depending on their distance from the CG. Taking moments about the centre of gravity, $$N_1\times d_1=N_2 \times d_2$$
The finger that is nearer to the CG will always have a larger normal contact force and hence, more friction. Hence, the ruler will tend to stop sliding along that finger and allow the other finger to slide nearer. When that other finger becomes closer to the CG, the ruler also stops sliding along it and tends to then slide along the first finger.
This keeps repeating until both fingers reach somewhere near the CG.
Activity 2: Moments of a Force at an Angle to the line between Pivot and Point of Action.
Recollection of the slides on moment of a force and torque of a couple.
Ask students to sketching on Nearpod’s “Draw It” slides the “perpendicular distance between axis of rotation and line of action of force” and “perpendicular distance between the lines of action of the couple” for Example 5 and 6 of the lecture notes respectively.
Mention that
axis of rotation is commonly known as where the pivot is
perpendicular distance is also the “shortest distance”
Activity 3: Conditions for Equilibrium
State the conditions for translational and rotational equilibrium
Show how translation equilibrium is due to resultant force being zero using vector addition
Show how rotational equilibrium is due to resultant moment about any axis being zero by equating sum of clockwise moments to sum of anticlockwise moments.
Go through example 7 (2 methods: resolution of vectors and closed vector triangle)
Useful tip: 3 non-parallel coplanar forces acting on a rigid body that is in equilibrium must act through the same point. Use 2006P1Q6 as example.
Go through example 8. For 8(b), there are two methods: using concept that the 3 forces pass through the same point or closed triangle.
For next lecture (pressure and upthrust):
Activity 4: Hydrostatic Pressure
Derive from definitions of pressure and density that $p = h\rho g$
Note that this is an O-level concept.
Activity 5: Something to sink about
Get students to explain how the ketchup packet sinks and floats.
Students are likely to come up with answers related to relative density. As them to draw a free body diagram of the ketchup packet. However, we will use the concept of the forces acting on the ketchup packet such as weight and upthrust to explain later.
Activity 6: Origin of Upthrust
I designed this GeoGebra app to demonstrate that forces due to pressure at different depths are different. For a infinitesimal (extremely small) object, the forces are equal in magnitude even though they are of different directions, which is why we say pressure acts equally in all directions at a point. However, when the volume of the object increases, you can clearly see the different in magnitudes above and below the object. This gives rise to a net force that acts upwards – known as upthrust.
Students are often confused about the forces in drawing free-body diagrams, especially so when they have to consider the different parts of multiple bodies in motion.
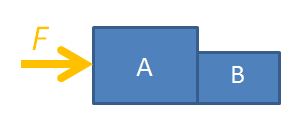
Two-Body Motion
Let’s consider the case of a two-body problem, where, a force F is applied to push two boxes horizontally. If we were to consider the free-body diagram of the two boxes as a single system, we only need to draw it like this.
Considering both boxes as a single system
For the sake of problem solving, there is no need to draw the normal forces or weights since they cancel each other out, so the diagram can look neater. Applying Newton’s 2nd law of motion, $F=(m_A+m_B) \times a$, where $m_A$ is the mass of box A, $m_B$ is the mass of box B, F is the force applied on the system and a is the acceleration of both boxes.
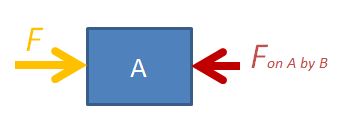
You may also consider box A on its own.
Considering box A on its own
The equation is $F-F_{AB}=m_A \times a$, where $F_{AB}$ is the force exerted on box A by box B.
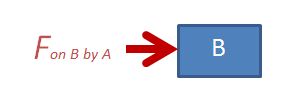
The third option is to consider box B on its own.
Considering box B on its own
The equation is $F_{BA}=m_B \times a$, where $F_{BA}$ is the force exerted on box B by box A. Applying Newton’s 3rd law, $F_{BA}=F_{AB}$ in magnitude.
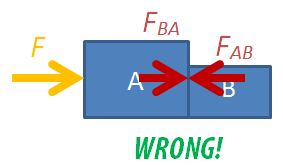
Never Draw Everything Together
NEVER draw the free-body diagram with all the forces and moving objects in the same diagram, like this:
You will not be able to decide which forces acting on which body and much less be able to form a sensible equation of motion.
Interactive
Use the following app to observe the changes in the forces considered in the 3 different scenarios. You can vary the masses of the bodies or the external force applied.
Multiple-Body Problems
For the two-body problem above, we can consider 3 different free-body diagrams.
For three bodies in motion together, we can consider up to 6 different free-body diagrams: the 3 objects independently, 2 objects at a go, and all 3 together. Find the force between any two bodies by simplifying a 3-body diagram into 2 bodies. This trick can be applied to problems with even more bodies.
I conducted an online lecture this morning using Google Meet for the students who had to stay home due to the Leave of Absence mandated by the Ministry since they had recently returned from another country during this period of the Covid-19 pandemic. I feel the need to document this as things might become bad enough that schools have to close, so it serves as a place where fellow teachers can pick up some tips on how to manage this.
The G Suite account that I used is that of my school’s, not MOE’s, because it allows me to record the session in case I need to show the session to students who did not “turn up” for the Meet. I am the G Suite admin for the school so I changed the setting to allow Google Meets to be recorded. After the session, the recorded Meet is automatically found in a G Drive folder after it has been processed in the backend. ICON’s Google Meet (part of MOE’s Google Suite service) does not allow recording.
My hardware setup is simple: just my laptop to capture my face and control the Google Meet UI and a second screen with which to show my slides. I also entered the Meet as another participant using my mobile phone as I wanted to see what my students would see for added assurance.
Google Meet is very user-friendly, with a minimalist and intuitive design that one can expect from Google (after all, that was what made it the preferred search engine in the early days of the internet). All we needed to do was to sign in to https://meet.google.com/ and start a session. You can also schedule a session on Google Calendar.
When a Meet is created, a URL is generated, which you can communicate to your students via text message or email, or through a system announcement.
When students log in, be sure to ask them to switch off their video and mute their voices so as not to cause any interference.
Note that what is shown in the presenter’s screen in Meet using the front camera of a laptop is laterally inverted as presenters generally want to see themselves as though they are looking at a mirror. So if you were to write things on a whiteboard or piece of paper, you will not be able to read the writing through your screen. However, rest assured that students can still read the writing if they are looking at you through the feed from your laptop’s front camera.
Instead, what I did was to toggle between showing my face on the camera and projecting a window or a screen.
For today’s Meet, I projected a window where my Powerpoint slides was on but did not go into slide mode (which will take up both my screens) as I wanted to be able to see the Google Meet UI at all times in order to know if anyone asked questions or raised an issue using the Chat function. This backchannel was very good as students could immediately tell me if they could see or hear me. I wanted them to be able to ask questions through that but nobody did, unfortunately.
A few times, I toggled to use the camera. Once, it was to show a simple physics demonstration which I felt added some badly needed variety.
For future sessions, I intend to project a single window with Chrome is so that I can project the slides using Google Slides in an extended mode. This will also allow me to switch to an online video with ease instead of selecting the window via the Google Meet UI, which might throw up too many options if one has many windows open (which I tend to do). I also intend to use Nearpod to gather some responses from the students.
I created this post here to bookmark some useful tools for use during my upcoming JC1 lectures on Dynamics.
This is a simulation for collisions that show the momenta before and after collisions. It requires registration after one visit.
A better choice for now could be the EJSS version (created by my ex-colleague Lawrence) which is far more detailed.
I had wanted to build one using GeoGebra and in fact, was halfway through it, but the Covid-19 pandemic has created other areas of work that now take priority.