Year: 2020

Magdeburg Hemispheres

As promised, I am sharing another purchase made during this mid-term break for my kids.

Magdeburg hemispheres are used to demonstrate the power of atmospheric pressure. This simple demonstration kit consists of two plastic hemispheres, a rubber ring, a one-way valve, a syringe and some rubber tubing.

First, the one-way valve and the syringe are attached to the hemisphere that has a nozzle.

The two hemispheres are then placed together with the rubber ring between them. The rubber ring will serve as a seal as the hemispheres press against it when the air is pumped out.

As the syringe is pulled, the pressure inside the sphere decreases. This results in the atmospheric pressure being significantly larger than the internal pressure and thus, the hemispheres can not be pulled apart by hand.

To separate the hemispheres, remove the tubing and the hemispheres will simply fall apart as the internal pressure rises and reaches an equilibrium with atmospheric pressure.

The kit can be bought for less than S$3 here. There are other sellers that seem to offer lower prices, which I realised while doing a search for the keywords “Magdeburg Hemispheres” only after making the purchase because I was thinking it could not get any lower.
Hydraulic Elevator

This is a hydraulic lift kit for kids that was purchased online for only S$2.10 from Shopee, with free shipping! I am not, in anyway, affiliated to this, but simply sharing about one of several fun and cheap educational sets that I bought to occupy my kids during this mid-term break.

Other than the syringe, joints and tube, the parts are mainly laser-cut from a piece of wood with a thickness of two millimetres. The instructions come with pictures for each step so even though the words are in Chinese, there is no need to read them.

This kit demonstrates Pascal’s principle which states that a pressure change in one part of a closed container is transmitted without loss to every part. Hence, the pressure change is transmitted from one syringe to another, allowing work to be done. Do not expect it to lift up very heavy weights, though as the syringes are not perfectly sealed.

I shall share about other kits that I bought for this break soon, including a $6.62 Tesla coil that I am looking forward to testing.

Braking of a Magnetic Pendulum with Copper Plate

In this video, we will observe how induced eddy currents in a copper plate slow down a magnetic pendulum. 

When the pendulum is set in motion, it usually oscillates for quite a while. This pendulum consists of a strong magnet.

If we slide a copper plate underneath the magnet while it is in motion, the magnet comes to a stop quickly. Note that copper is not a ferromagnetic material, which means it does not get attracted to a stationary magnet.

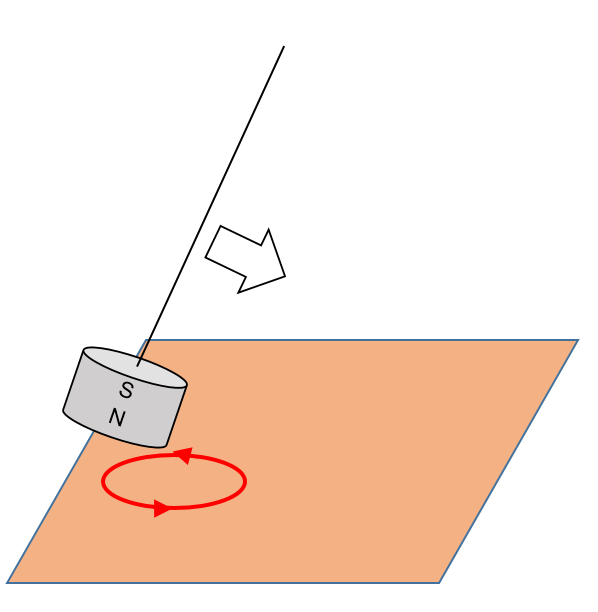
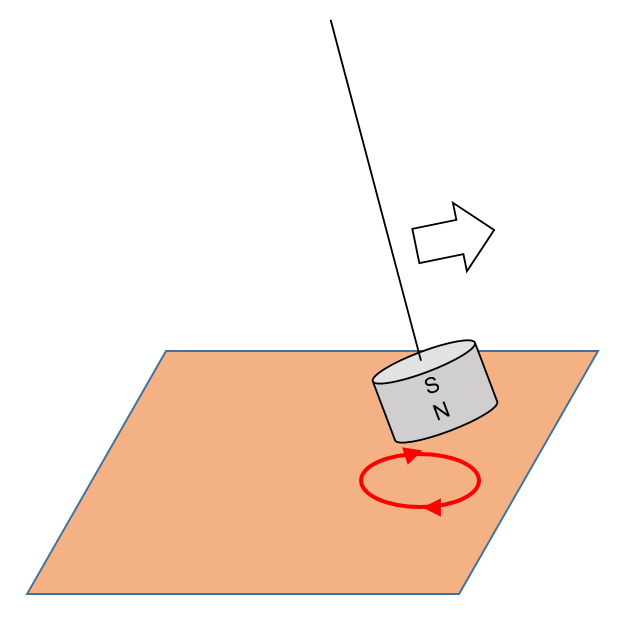
As the magnet moves across an area on the copper plate, the change in magnetic flux induces eddy currents on the plate. These eddy currents flow in such a way as to repel the magnet as it approaches the plate and attracts the magnet as it leaves the plate, therefore slowing the magnetic pendulum.

Eddy currents repels the magnet as it approaches
Eddy currents attracts the magnet as it leaves

When we pull the copper sheet out from under a stationary magnetic pendulum, the eddy currents will flow in such a way that it becomes attracted to the copper sheet.

Moving the copper sheet to and fro at a certain frequency (the pendulum’s natural frequency), the magnetic pendulum can be made to oscillate again.

Non-Uniform Vertical Circular Motion

Using a chain of rubber bands, I swung a ball around in a vertical loop. This demonstration shows how the tension in an elastic band changes according to the position of the ball, by referring to the length of the elastic band.

Securing the elastic band to the ball with a shoelace

When the ball of mass $m$ is at the bottom of the loop, the centripetal force is given by the difference between tension $T_{bottom}$ and weight $mg$, where $T_{bottom}$ varies depending on the speed of the ball $v_{bottom}$ and the radius of the curvature $r_{bottom}$.

$T_{bottom} – mg = \dfrac{mv_{bottom}^2}{r_{bottom}}$

When the ball is at the top of the path, it is given by

$T_{top} + mg = \dfrac{mv_{top}^2}{r_{top}}$

As the weight is acting in the same direction to tension when the ball is at the top, a smaller tension is exerted by the elastic band to maintain a centripetal force. Therefore , $T_{bottom} > T_{top}$.

The GeoGebra app below shows a simpler version of a vertical loop – a circular path with a fixed radius $r$. Consider a ball sliding around a smooth circular loop. The normal contact force varies such that

$N_{bottom} = \dfrac{mv_{bottom}^2}{r} + mg$

$N_{top} = \dfrac{mv_{top}^2}{r} – mg$

It can be shown that the minimum height at which the ball must be released in order for it to complete the loop without losing contact with the track is 2.5 times the radius of the frictionless circular track.

If we were to consider the rotational kinetic energy required for the ball to roll, the required initial height will have to be 2.7 times the radius, as shown in the video below:

Many thanks to Dr Darren Tan for his input. Do check out his EJSS simulation of a mass-spring motion in a vertical plane, which comes with many more features such as the ability to vary the initial velocity of the mass, graphs showing the variation of energy and velocity, as well as an option for a mass-string motion as well.