I have not been posting in this blog for a while as I have been rather busy in my new role at the Ministry of Education HQ. My main area of work is related to the Singapore Student Learning Space, an online portal in which curriculum-aligned resources are made available for students in Singapore to learn anytime, anywhere. It’s about to be rolled out to all non-pilot schools soon, so I won’t be posting here for a while longer.
Until then, please let me know if there are any simulations or resources that you would like me to work on. Any such work will have to be during my free time, somewhere between rest and family time.
My school organises a competition for upper primary pupils in Singapore annually. Called the THINK Challenge, it gets participants to engage in problem-solving with a little help from the internet, team work and experimentation. “THINK” stands for the stages of the cycle of inquiry learning: Trigger, Harness, Investigate, Network and Know.
In this year’s Challenge, participants were tasked to construct a water wheel that is able to lift a 20g mass up a height of 30cm. This task is known as the “Trigger”. Participants were given 30 min on the internet to gather information while also “harnessing” their prior knowledge on energy conversions, frictional force, etc.
They were then given time during the “Investigate” phase to experiment and test out their prototypes. Our student facilitators then assisted to test the efficiency of their prototypes based on the amount of water used to lift the mass over the required distance.
In the “Network” phase, participants had to make a short presentation in front of a panel of judges, explaining the scientific principles involved, design considerations, limitations and suggestions for improvement.
Finally, the competition was wrapped up with a brief summary of the learning points in the “Know” stage just before handing out the prizes.
The winning teams this year were:
1st place: Maha Bodhi Primary School Team 1
2nd place: Bedok Green Primary School Team 1
3rd place: Haig Girls’ School Team 1
What Makes a Good Water Wheel?
Through this competition, we hoped that participants picked up new scientific knowledge through the inquiry-learning approach.
Some of the considerations needed when constructing and testing the water wheel include:
Ways to reduce friction. Most participants realise early on that they need to allow the axle of the water wheel to turn with minimal friction. This means that they need to insert the chopstick given to them into a straw, and affix the water wheel to the straw while clamping the chopstick to a retort stand (a requirement for the competition). They also need to ensure that the string does not end up winding around the chopstick.
Mass of water wheel. A heavy water wheel tends to be harder to turn due to a larger moment of inertia as well as greater friction at the axle.
Finding an optimal height to pour the water from. They were given a bottle to pour out the water from and were allowed to pour the water from any height. While it makes sense to pour the water high above the wheel initially to achieve maximum gravitational potential energy, it was also resulting in inaccuracy and needless splashing of water.
The type and arrangement of the water “buckets”. The buckets for carrying water in order to turn the wheel can be made of disposable cups or spoons, and should be arranged in regular intervals to ensure smooth rotation of the wheel. There has to be an optimal number of such buckets because if they are spaced too far apart, the lifted mass will turn the water wheel back in the opposite direction whenever the buckets are not doing work.
This water wheel from Haig Girls’ School used only 201 g of water
The position at which to tie the string to the weight. The mass to be lifted is attached to a string and this string has to be fixed to the turning wheel. If the string is tied too close to the circumference of the wheel, there may not be sufficient torque to lift the weight. If the string is too close to the axle, it will require more turns in order to lift the weight by the requisite height. The winning team managed to create an optimal distance between the string and the axle by using ice cream sticks.
The winning water wheel from Maha Bodhi School used only 123 g of water.
A physics demonstration on how to measure the speed of sound in air using Audacity, an open source audio recording software. There are Windows and Mac versions of this free software, and even a portable version that can run off a flash drive without needing to be installed on a computer (for school systems with stricter measures regarding installing of software).
The sound is reflected along a long hollow tube that somehow, existed in our school’s laboratory. The two sound signals were picked up using a clip-on microphone attached to the open end of the tube and plugged into the laptop. I used my son’s castanet which gives a crisp sound and hence, a simple waveform that will not have the echo overlapping with the generated sound. The timing at which the sound signals were first detected were read and subtracted to obtain the time taken for the wave to travel up and down the 237 cm tube.
The value of the speed of sound calculated is 356 m/s, which is a bit on the high side due to the temperature of 35°C and relative humidity of between 60-95% when the reading was carried out.
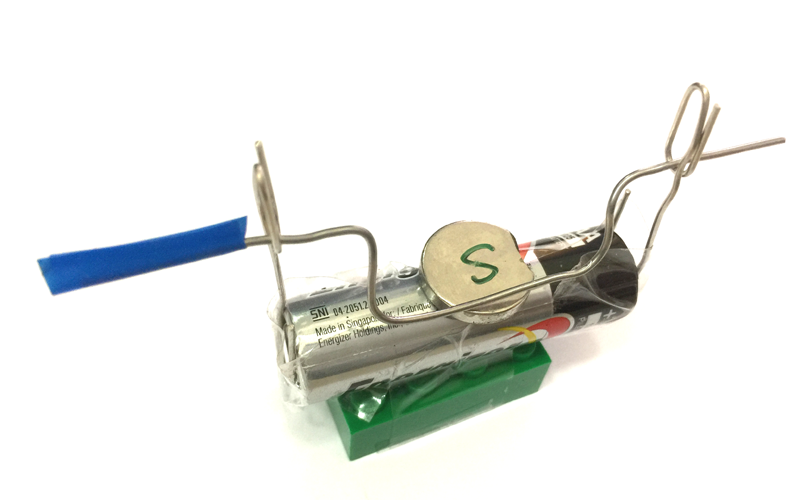
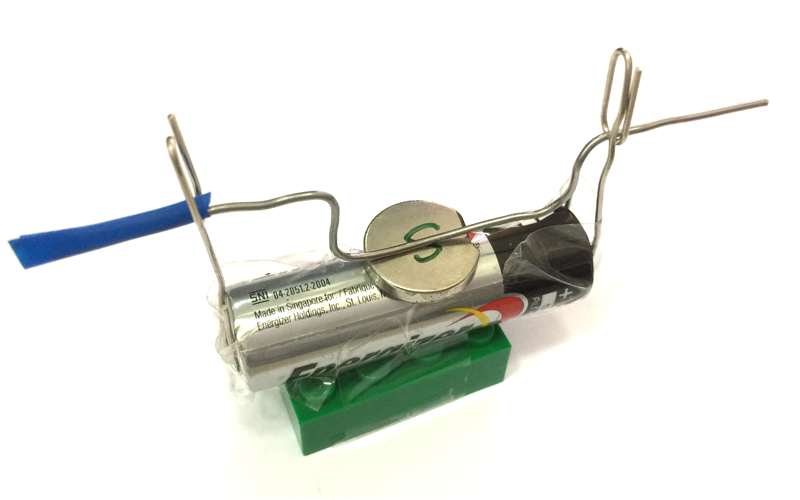
Using a neodymium magnet, some paper clips and a battery, you can demonstrate the magnetic force acting on a current-carrying wire while recalling Fleming’s left-hand rule. Using the same frame constructed in the previous video, you just need to add a wire with a few bends in between to create a U-shape in the middle as shown in the picture below. A small piece of insulating tape (you can use any adhesive tape) is added to one end of the wire to show the original dangling position of the U-shape before current flows through it. Be sure to leave some space at the end with the insulating tape for you to switch on and off the current by pushing that end in and out.
With the south pole facing up and the current flowing from right to left, the magnetic force acts towards you.When the insulating tape touches the paper clip, current stops flowing and there is no magnetic force.With the south pole facing up and the current flowing from right to left, the magnetic force acts away from you.
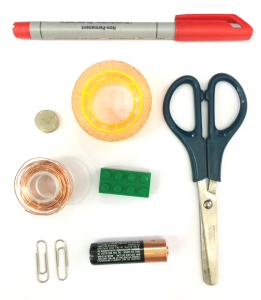
Using material that is easily available, you can build a simple homopolar D.C. motor (one that uses a single magnetic pole. I made the video above to help you do so.
The material used are as follows:
insulated copper wire
paper clips
neodymium magnet
1.5V AA battery
plastic or wooden block (I used a 4×2 Lego block)
scissors
permanent marker
adhesive tape
The steps involved are:
Attaching the magnet on the side of the battery using a long piece of adhesive tape and sticking both of them onto the Lego block. The polarity of the magnet does not matter.
Next, we need to shape one end of each paper clip so as to make it longer and to make a small loop at the top. The paper clips are then fixed on the ends of the battery using adhesive tape.
Coiling wire can be done with the help of a round cylindrical object such as a marker. Roughly 10-15 coils will do.
The ends of the wire can used to bundle the coils together. Make sure they are tied up tightly.
Since we are using an insulated wire (otherwise the current will just go straight from one paper clip to another without passing through the coils), we need to scrape of the insulation at the ends using either sandpaper or the edge of a pair of scissors.
Using a permanent marker, we can colour one side each end in order to insulate that side. This will prevent current from flowing through the loops for half of every cycle. It has the same effect as that of a commutator.
Finally, we will mount the coils onto the two paper clips and allow the motor to spin.
Do take note that the motor should not be left connected to the battery for too long as it will drain the battery very quickly and generate a lot of heat in the process.
How this can be used for the O-level/A-level syllabus
Teachers can use this as a demonstration that shows the motor effect of a current in a wire placed in a magnetic field, as well as to apply Fleming’s left-hand rule.
One can also make an second coil without insulating half the surface of the points of contact with the paper clips to show the importance of the commutator in a DC motor. The coil will simply oscillate to and fro due to the change in direction of the magnetic force on the lower half of the loop every half a turn.
I made this rather simple video this morning showing a physics demonstration on the effect of magnetic shielding. A paper clip is shown to be attracted to a magnet. A series of objects are placed in between, such as a plastic ruler, a steel ruler, a steel bookend, and some coins of different alloys.
It is interesting to note the types of material that provide magnetic shielding and those that do not. There is even a distinction between the types of steel, which is an alloy containing iron. Ferritic steel is magnetic while austenitic steel is not.
The theory behind magnetic shielding is that the flat magnetic material will direct the field lines of the magnet along its plane instead of allowing them to pass through, thus depriving the paper clip of a strong enough magnet field to keep it flying.