Seng Kwang Tan

Boiling under Reduced Pressure

With the help of a simple manual vacuum pump that is used to keep food fresh, we can demonstrate the effect of a reduced pressure on the boiling point of water. This leads students to a discussion on what it takes to boil a liquid and a deeper understanding of the kinetic model of matter.

Materials

  1. Vacuum food storage jar with hand-held vacuum pump
  2. Hot water

Procedure

  1. Boil some water and pour them into the jar such that it is half filled. This is necessary as hand-held vacuum pumps are not able to lower pressure enough for boiling point to drop to room temperature.
  2. Cover the jar with the lid and draw out some air with the vacuum pump.

Explanation

When water boils, latent heat is needed to overcome the intermolecular forces of attraction as well as to overcome atmospheric pressure. Atmospheric air molecules would prevent a significant portion of the energetic water molecules from escaping as they will collide with one another, and cause them to return beneath the liquid surface.

Removal of part of the air molecules within the jar lowers the boiling point of water because less energy is needed for molecules to escape the liquid surface.
Egg out of Flask

In a previous demonstration, we put a boiled egg into a flask with a mouth narrower than the egg. The challenge is now to remove the egg from the flask without breaking it.

Materials

  1. Flask
  2. Egg
  3. Water
  4. Bunsen burner or candle

Procedure

  1. Pour some water into the conical flask.
  2. Invert the flask quickly over a tray such that the egg seals the mouth of the flask, preventing the water from coming out.
  3. Light a flame and place the part of the flask with water over the flame. This will help prevent the heat from cracking the flask.
  4. Place a tray under the mouth of the flask as the egg slides out to prevent a mess.

Explanation

The flame heats up the air and the water in the flask. The heated air expands while some of the water vapourizes. With the increase in amount of gas and temperature, the pressure within the flask increases.

Egg into Flask

This classic physics demonstration is used to show the effects of pressure difference between the atmosphere and a cooling volume of air. With a set of clean apparatus, you can even have the egg for a snack after that.

Materials

  1. Hard-boiled Egg
  2. Flask or glass bottle with mouth smaller than the egg
  3. Paper measuring about 2 cm by 5 cm
  4. Lighter

Procedure

  1. Peel the hard-boiled egg.
  2. Light the piece of paper and drop it into the flask.
  3. Place the peeled egg on the mouth of the flask such that the egg seals the flask.
  4. Observe the egg being sucked in while the flame dies.

Explanation

When the burning paper enters the flask, it causes the air within the flask to heat up and expand, with some escaping from the flask. When the egg seals the flask, the flame dies as the paper is about to be burned up while oxygen is also running out.

The air then cools down and the pressure within the flask drops. The pressure due to the atmosphere acting downward on the egg is then greater than that acting upward due to the pressure of the cooling air. This pushes the egg into the bottle.

15. Electromagnetism

[accordions autoHeight=’true’]

[accordion title=”1. Definitions”]

  • The magnetic flux density at a point is defined as the force acting per unit current per unit length of the conductor when the conductor is placed at right angles to the field.
  • One tesla is the uniform magnetic flux density which, acting normally to a long straight wire carrying a current of 1 ampere, causes a force per unit length of 1 N m–1 on the conductor.

[/accordion]

[accordion title=”2. Magnetic Fields”]

  • The following are the vector symbols used in diagrams to represent the direction of vectors in 3 dimensional space:
    • $$\rightarrow$$ : on the plane of the page
    • $$\otimes$$ : into of the page
    • $$\odot$$ : out of the page
  • The following are some important points to take note when representing a magnetic field by magnetic field lines:
    • Magnetic field lines appear to originate from the north pole and end on the south pole.
    • Magnetic field lines are smooth curves.
    • Magnetic field lines never touch or cross.
    • The strength of the magnetic field is indicated by the distance between the lines – closer lines mean a stronger field.

[/accordion]

[accordion title=”3. Force on a Current-Carrying Conductor in a Magnetic Field”]

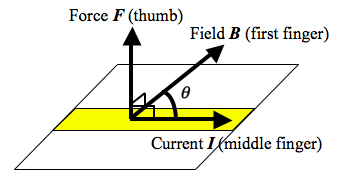
  • When a wire of length $$l$$ carrying a current $$I$$ lies in a magnetic field of flux density $$B$$ and the angle between the current $$I$$ and the field lines $$B$$ is $$\theta$$, the magnitude of the force $$F$$ on the conductor is given by $$F = BIl sin \theta$$.
    magnetic force
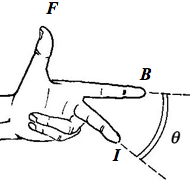
  • The directions of the vectors can be recalled by using the Fleming’s Left-Hand Rule.
    Fleming's Left-Hand Rule

[/accordion]

[accordion title=”4. Force on a Moving Charge in a Magnetic Field”]

  • A charge $$q$$ travelling at constant speed $$v$$ at an angle $$theta$$ to a magnetic field of flux density $$B$$ experiences a force $$F = Bqv sin\theta$$.

[/accordion]

[accordion title=”5. Magnetic fields of current-carrying conductors”]

  • Long straight wire
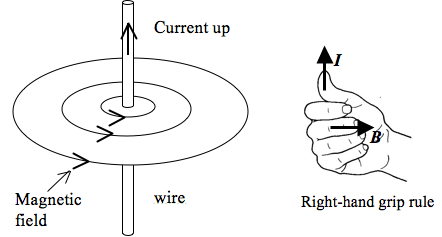
    Right-Hand Grip Rule
  • Flat circular coil
  • Solenoid

[/accordion]

[accordion title=”6. Ferromagnetic Materials”]

[/accordion]

[accordion title=”7. Force between Two Parallel Current-Carrying Conductors”]

  •  Like currents attract and unlike currents repel.

[/accordion]

[/accordions]

Single Slit Diffraction using Fingers

This demonstration requires no material other than your own fingers. Hold your index and middle fingers close to each other, leaving a small slit between them about 1 mm in width.

Look through the slit into a source of light such as the window or a lamp. You will need to look with one eye up close to the slit. Warning: do not look directly at the sun.

You will be able to see a number of vertical dark lines between the fingers.

diffraction and interference pattern,

Science Explained

So where do these vertical lines come from? They are dark fringes caused by destructive interference of light when it diffracts through your finger tips.

This phenomenon can be explained using Huygens’ principle. Huygens pictures every point on a primary wavefront as a source of secondary wavelets and the sum of these secondary waves determines the form of the wave at any subsequent time. Hence, each of these secondary wavelets can interference with one another.

Constructive interference takes place when the difference in path lengths between two coherent waves is an integer multiple of the wavelength. This is when the resultant wave is the brightest. Destructive interference occurs when that difference in path length is a half-integer of the wavelength (e.g. $\frac{1}{2}\lambda$, $\frac{3}{2}\lambda$, $\frac{5}{2}\lambda$, etc.) and gives a dark fringe.

The alternating bright and dark fringes is a diffraction pattern, which becomes observable by the eye looking through the slit.

Ionisation of Air to Remove Static Electric Charges

Materials

  1. Wool
  2. PVC pipe or plastic comb
  3. String
  4. Lighter

Procedure

  1. Hang the string from an elevated position. Leave the bottom end free.
  2. Rub the PVC pipe with wool. This deposits negative charges, or electrons, onto the surface of the PVC pipe.
  3. Place the side of the pipe that is rubbed near the string. You should notice the string being attracted  towards the PVC pipe.
  4. Holding the PVC pipe still while attracting the string, light a flame using the lighter and place it in between the string and pipe. You should observe the string falling back to its original position.

Science Explained

When air is ionised with the help of a flame, it serves as a conducting medium through which static electric charges can escape from a surface.