Building a Simple DC Motor
Using material that is easily available, you can build a simple homopolar D.C. motor (one that uses a single magnetic pole. I made the video above to help you do so.
The material used are as follows:
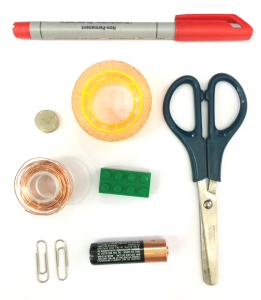
- insulated copper wire
- paper clips
- neodymium magnet
- 1.5V AA battery
- plastic or wooden block (I used a 4x2 Lego block)
- scissors
- permanent marker
- adhesive tape
- Attaching the magnet on the side of the battery using a long piece of adhesive tape and sticking both of them onto the Lego block. The polarity of the magnet does not matter.
- Next, we need to shape one end of each paper clip so as to make it longer and to make a small loop at the top. The paper clips are then fixed on the ends of the battery using adhesive tape.
- Coiling wire can be done with the help of a round cylindrical object such as a marker. Roughly 10-15 coils will do.
- The ends of the wire can used to bundle the coils together. Make sure they are tied up tightly.
- Since we are using an insulated wire (otherwise the current will just go straight from one paper clip to another without passing through the coils), we need to scrape of the insulation at the ends using either sandpaper or the edge of a pair of scissors.
- Using a permanent marker, we can colour one side each end in order to insulate that side. This will prevent current from flowing through the loops for half of every cycle. It has the same effect as that of a commutator.
- Finally, we will mount the coils onto the two paper clips and allow the motor to spin.
Discussion
0 views •