As I was teaching the use of the potential divider equation to my IP4 (Grade 10) students last week, I approached it by teaching the rules first before showing worked examples. Thereafter, as some students remained confused, I merely reverted to explaining the rules. Eventually, I resorted to simplifying the equation by substituting simple numerical values in place of the multiple symbols that we use for emf, terminal p.d., resistance (more than one of them) and current, and many students’ eyes lit up. It struck me then that I should have used the Concrete-Representational-Abstract approach in the first place.
Concrete-Representational-Abstract in Singapore Maths
Potential Divider Worksheet
Incidentally, I was reminded of this approach while helping my daughter with her Primary 2 Math homework last week. Since she was absent due to a stomach flu for 3 days this week, she had to bring work home to complete. There was an exercise on subtraction of numbers by separating into hundreds and tens and the first question looked like this:
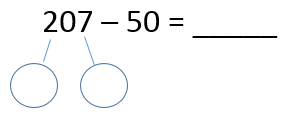
There I was stuck at a primary school problem, not because I did not know that final answer is 157 but because I was not sure what to fill in for the circles. It did not help that my daughter was not clear about what to do either.
I then looked at her textbook for examples and what I saw was pictures of blocks in groups of 100s and 10s that look like this:
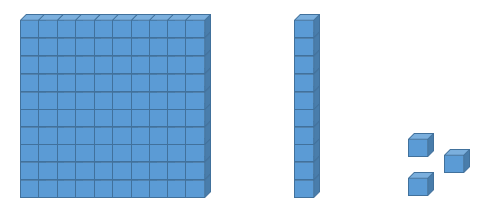
These are the tools that students in her class would have played with in the concrete or representation stage of learning. They can physically manipulate the blocks in order to do subtraction, which can be fun for those who like learning with a hands-on activity.
The abstract stage required by the question is for students to
- remove 100 from the first number 207, leaving 107 (so the two circles will have numbers 100 and 107 in them)
- deduct the second number from 100
- and add the difference back to 107.
This is a technique that allows students to make quick mental calculations when subtracting tens from numbers more than 100 but requires a fair bit of practice to get used to. My daughter eventually had no problem with the rest of her homework after we figured this out.
Being a Physics teacher, I thought about how I could transfer this method of making a complex and abstract skill easier to pick up through concrete representations.
Usual Approach: Abstract to Concrete
In my IP4 Physics classes, we are currently on the topic of DC circuits, which involves calculations involving the potential divider method.
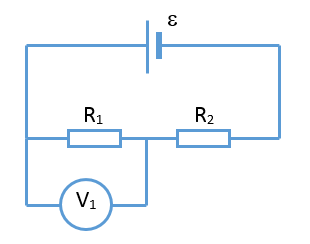
One of the main equations is the potential divider rule, in which V1 (p.d. across resistor R1) is given by
$V_1=\dfrac{R_1}{R_1+R_2}\times\epsilon$
For two classes, I started directly with equations before introducing examples (abstract to concrete), which is what physics teachers usually do. There is nothing wrong with this approach as students still see a concrete representation eventually but I was wondering if it might be more beneficial if students could synthesize the equation on their own by generalizing from examples. By the time I taught this same concept to the second class, I realized that most students were able to understand the equation only after giving concrete examples using numerical values.
Concrete Examples before Equations
For my third class, after being inspired by my daughter’s homework, instead of introducing the equations straightaway, I started by introducing the concept of dividing emf between two resistors in series according to ratio of resistance. I used simple numbers for easier reference. In this way, I felt that students could then always link the equation back to the simple concept of ratios which helps them understand the intent of the equation.
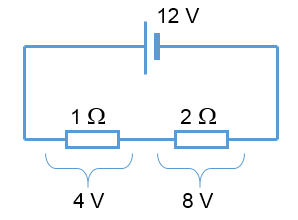
When students see after one or two examples that all we are doing is trying to distribute the emf in proportion to the resistance that each resistor has so that it follows the ratio R1:R2 (concrete stage), I asked them to replace the numerical values with symbols (representation stage).
$\dfrac{1\Omega}{2\Omega}=\dfrac{4 V}{8V}$ or $\dfrac{1\Omega}{(1+2)\Omega}=\dfrac{4 V}{(4+8)V}$
(Concrete stage)
$\dfrac{R_1}{R_2}=\dfrac{V_1}{V_2}$ or $\dfrac{R_1}{R_1+R_2}=\dfrac{V_1}{V_1+V_2}$
(Representation stage)
From the last equation, students were asked to recall that emf is equal to the sum of the p.d. in the series circuit. The equation can then be rewritten as
$\dfrac{R_1}{R_{total}}=\dfrac{V_1}{\epsilon}$ or $V_1=\dfrac{R_1}{R_{total}}\times\epsilon$
(Abstract stage)
I believe that if students can arrive that the final equation from the basic principles, they will understand more deeply and will be able to apply it in slightly different contexts, such as when there are more than 2 resistors in series, or when one resistor is varying (in the case of transducers such as LDRs and thermistors) or even when considering internal resistance of the cell.
Here’s a simple worksheet that students can use to work out the potential divider equation on their own.
P.S. This is not a research study that compares whether abstract to concrete is better than the other way round, but merely a way for me to record what I’ve tried in different classes. I welcome comments from other teachers who may have tried a similar approach and have observed positive results.
