IP3 05 Density and Pressure

Manometer Simulation using GeoGebra

After trying to create a javascript simulation for the manometer using ChatGPT, I decided to return to GeoGebra, a platform that I am more used to, to create this interactive with more customisation. It comes with a ruler and a self-assessment feature for students to key in the value of pressure.

https://www.geogebra.org/m/qyuncz3h

A U-tube manometer is a fundamental device used to measure pressure differences in fluid systems with simplicity and precision. It consists of a U-shaped tube typically made from transparent glass or plastic, allowing for clear observation of fluid levels within the tube. The tube is partially filled with a manometric fluid such as mercury or water, chosen based on the expected pressure range and application. The manometer has a graduated scale for measuring the height difference between the fluid levels in the two arms of the U-tube. The device is connected at two points where the pressure difference needs to be assessed, such as in gas pipelines, liquid tanks, or other systems requiring pressure monitoring.

When the manometer is connected to the pressure sources, the fluid within the U-tube will adjust its levels until equilibrium is achieved, with one side rising and the other side falling. The difference in height between the two columns of fluid (h) indicates the pressure difference. This difference is read using the graduated scale and is used to calculate the pressure difference (ΔP) with the formula ΔP = ρgh, where ρ is the density of the manometric fluid, and g is the acceleration due to gravity.
U-tube Manometer – a ChatGPT-Generated Simulation

I wanted a simple manometer simulation for the Sec 3 topic of Pressure and decided to try generating one with ChatGPT3.5. The first attempt, using just words, resulted in many errors such as single lines instead of 2D objects being used to represent the tubes and coloured bars that move in the wrong direction.

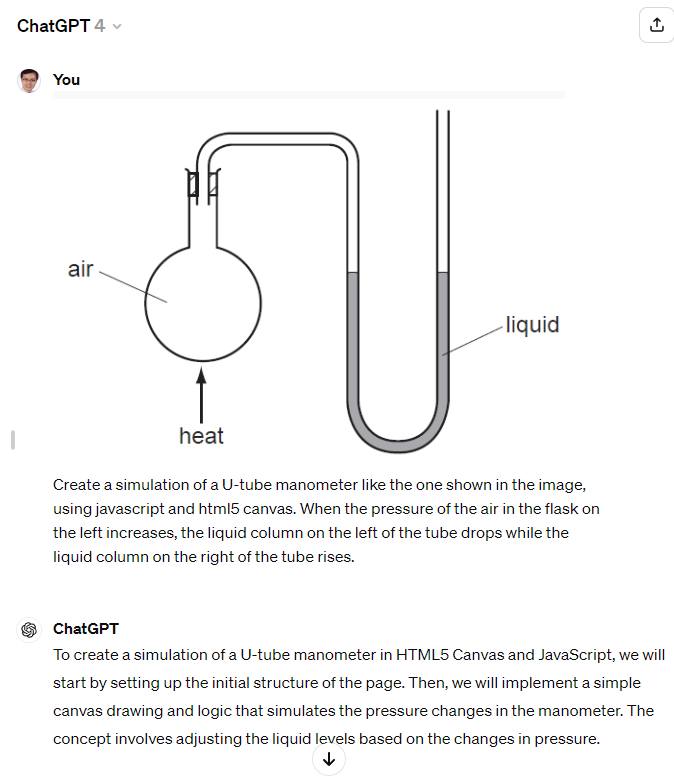
However, after I switched to ChatGPT4 and uploaded an image for reference, it was then able to produce a proper design consisting of glass tubes and coloured columns that move up and down with pressure changes in a flask. With a bit of UI changes using further prompts, this was the final product.


Link

The following is the screenshot showing the image that was uploaded as well as the initial prompt.

Pythagorean Cup

This is a 3D printed Pythagorean cup, otherwise known as a greedy cup, where if one pours far too much water or wine or whatever your greedy heart desires, all the contents in the cup will leak out through the bottom.

This is based on the design by “jsteuben” on Thingiverse (https://www.thingiverse.com/thing:123252). The siphoning effect kicks in when the water level is above the internal “tube” printed and hidden into the walls of the cup.

I printed another cup based on a more conventional design as well, but due to the wrong settings given when I prepared the gcode file, the cup was rather leaky when the water level was low. This design by “MonzaMakers” has a protruding siphon tube. (https://www.thingiverse.com/thing:562790)

Explaining how the siphon works is easier with the second cup. When the water level is lower than the highest point in the siphoning tube, it remains in the cup. When it exceeds the highest point of the tube, water begins to flow down the part of the tube leading to the opening at the bottom of the cup. The falling water column creates a suction effect and continuously draws the rest of the water in, until the cup is dry.

Magdeburg Hemispheres

As promised, I am sharing another purchase made during this mid-term break for my kids.

Magdeburg hemispheres are used to demonstrate the power of atmospheric pressure. This simple demonstration kit consists of two plastic hemispheres, a rubber ring, a one-way valve, a syringe and some rubber tubing.

First, the one-way valve and the syringe are attached to the hemisphere that has a nozzle.

The two hemispheres are then placed together with the rubber ring between them. The rubber ring will serve as a seal as the hemispheres press against it when the air is pumped out.

As the syringe is pulled, the pressure inside the sphere decreases. This results in the atmospheric pressure being significantly larger than the internal pressure and thus, the hemispheres can not be pulled apart by hand.

To separate the hemispheres, remove the tubing and the hemispheres will simply fall apart as the internal pressure rises and reaches an equilibrium with atmospheric pressure.

The kit can be bought for less than S$3 here. There are other sellers that seem to offer lower prices, which I realised while doing a search for the keywords “Magdeburg Hemispheres” only after making the purchase because I was thinking it could not get any lower.

Hydraulic Elevator

This is a hydraulic lift kit for kids that was purchased online for only S$2.10 from Shopee, with free shipping! I am not, in anyway, affiliated to this, but simply sharing about one of several fun and cheap educational sets that I bought to occupy my kids during this mid-term break.

Other than the syringe, joints and tube, the parts are mainly laser-cut from a piece of wood with a thickness of two millimetres. The instructions come with pictures for each step so even though the words are in Chinese, there is no need to read them.

This kit demonstrates Pascal’s principle which states that a pressure change in one part of a closed container is transmitted without loss to every part. Hence, the pressure change is transmitted from one syringe to another, allowing work to be done. Do not expect it to lift up very heavy weights, though as the syringes are not perfectly sealed.

I shall share about other kits that I bought for this break soon, including a $6.62 Tesla coil that I am looking forward to testing.

Hydraulic Press Simulation

This simulation can be used for O-level Physics, for the topic of Pressure. I created it as it was relevant to our school’s IP3 physics as well.

It demonstrates the working principle of a hydraulic press. By adjusting the cross-section areas (A) of the two cylinders, you only need a small amount of force at the narrow piston to exert a large amount of force at the wider piston. This is how, when driving, the force applied by one’s foot is enough to supply a large force to apply the brake pads on a car’s wheels.

The advantage of using GeoGebra is that one can create such simple simulations within a couple of hours and it can be readily embedded into Google Classroom, Microsoft OneNote, SLS – a wonderful tool to have during this period of full home-based learning.

View on GeoGebra here.