IP Topics

Learning about Sound with Audacity

Audacity is a free audio recording and editing software downloadable from http://audacity.sourceforge.net. It is cross-platform meaning you can run it on PC or Mac.

Once you have the software installed, you can try out some of its simpler functions, such as recording and playing back. You can also generate tones of known frequencies, which will be useful for experiments such as using stationary waves to determine the speed of sound in air.

Frequency and pitch

The first activity serves as an introduction to the software and can be easily carried out. All you need is a computer with Audacity installed and a microphone connected to it. Tuning forks of different frequencies will be best for this activity because of the simple and pure waveforms generated. A regular wave pattern can also be recorded with the help of a musical instrument such as a guitar or by singing a note.

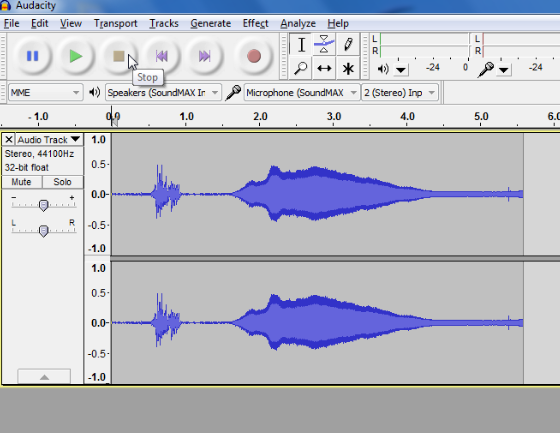
To make a sound with the tuning fork, strike it against something hard such as the heel of your hand. The two prongs of the fork, known as “tines,”  will then vibrate with a fixed frequency, thus generating a waveform with a displacement that is almost sinusoidal. Place this tuning fork next to the microphone and you should see a densely packed waveform like the following:

using-audacity-to-learn-about-sound

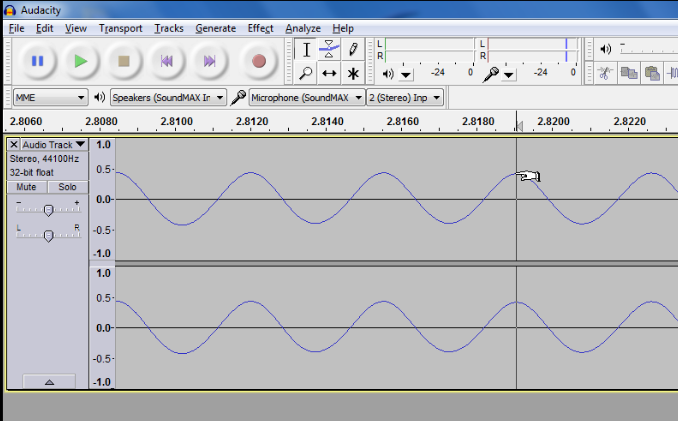
Zoom into the peaks recorded by clicking on the peaks of interest and pressing Ctrl 1 for Windows or Command 1 for Mac. You should observe a repeated pattern in the waveform.

audacity-sound-experiment

By reading off the time difference on the horizontal axis between two peaks, you can measure the period of the wave. Using $$f=\frac{1}{T}$$ where f is the frequency of the wave, and T is the period, you can verify the frequency measured with the known value of the tuning fork’s frequency.

In the above graph, the period is 2.8190-2.8155 = 0.0035s. The frequency of the tuning fork used is given by $$f=\frac{1}{T}=\frac{1}{0.0035}= 286 \text{ Hz}$$ which is roughly that of a D note.

Squishy Circuits

image taken from http://courseweb.stthomas.edu/apthomas/SquishyCircuits/howTo.htm

I came across this Ted video on Squishy Circuits, presented by AnnMarie Thomas from the University of St Thomas and found it to be a suitable activity for kids. I shall attempt to make some when I am free with instructions from the following site:

http://courseweb.stthomas.edu/apthomas/SquishyCircuits/index.htm

Be sure to watch this page for photos and videos!

As I was contemplating the potential of combining conductive and insulating dough to make fun toys with the help of electric motors and the learning that can come from it. Apart from the obvious learning related to electrical resistance and current, we can even learn about flotation and fluid dynamics by building floating boats of different hull shapes.

Boiling under Reduced Pressure

With the help of a simple manual vacuum pump that is used to keep food fresh, we can demonstrate the effect of a reduced pressure on the boiling point of water. This leads students to a discussion on what it takes to boil a liquid and a deeper understanding of the kinetic model of matter.

Materials

  1. Vacuum food storage jar with hand-held vacuum pump
  2. Hot water

Procedure

  1. Boil some water and pour them into the jar such that it is half filled. This is necessary as hand-held vacuum pumps are not able to lower pressure enough for boiling point to drop to room temperature.
  2. Cover the jar with the lid and draw out some air with the vacuum pump.

Explanation

When water boils, latent heat is needed to overcome the intermolecular forces of attraction as well as to overcome atmospheric pressure. Atmospheric air molecules would prevent a significant portion of the energetic water molecules from escaping as they will collide with one another, and cause them to return beneath the liquid surface.

Removal of part of the air molecules within the jar lowers the boiling point of water because less energy is needed for molecules to escape the liquid surface.

Egg out of Flask

In a previous demonstration, we put a boiled egg into a flask with a mouth narrower than the egg. The challenge is now to remove the egg from the flask without breaking it.

Materials

  1. Flask
  2. Egg
  3. Water
  4. Bunsen burner or candle

Procedure

  1. Pour some water into the conical flask.
  2. Invert the flask quickly over a tray such that the egg seals the mouth of the flask, preventing the water from coming out.
  3. Light a flame and place the part of the flask with water over the flame. This will help prevent the heat from cracking the flask.
  4. Place a tray under the mouth of the flask as the egg slides out to prevent a mess.

Explanation

The flame heats up the air and the water in the flask. The heated air expands while some of the water vapourizes. With the increase in amount of gas and temperature, the pressure within the flask increases.