IP Topics

Electroscope

An electroscope is a device that can be used to detect or measure the amount of charge in its vicinity. One of the earliest electroscopes is the gold-leaf electroscope which was invented by a British clergyman Abraham Bennet. This is a cheaper model of the leaf electroscope made using aluminum foil.

Materials

  1. Paper clip
  2. Aluminum foil
  3. Modelling clay
  4. Glass bottle with a narrow neck
  5. Steel or brass sinker

Procedure

  1. Cut two strips of aluminum foil measuring 2 cm by 0.5 cm.
  2. Straighten the paper clip before bending both ends to make two hooks. Hang the paper clip using one hook from the sinker.
  3. Pierce each aluminum strip at one end through the other hook of the paper clip, leaving it to hang from the hook.
  4. Place the paper clip and aluminum strips inside the bottle. If the sinker is smaller than the neck of the bottle, use some modeling clay to keep it in place.
  5. Now you can test the electroscope by rubbing a comb with some wool and placing it near the paper clip.

Science Explained

Negative charges (electrons) are deposited on the comb by rubbing with wool. When the comb is placed near the sinker without touching, the negative charges in the sinker are repelled. As glass is an electric insulator, the only way for them to go is downwards onto the aluminum strips. Both strips are now negatively charged and will repel each other. The extent of their repulsion is dependent on the amount of charge on the comb and its distance from the electroscope.

Oersted’s Experiment

Hans Christian Oersted showed that an electric current can affect a compass needle in 1820. This confirms the direct relationship between electricity and magnetism, which in turn, paved the way for further understanding of the two. The direction of the magnetic field can be changed by flipping the wire around, which suggests that the direction of the magnetic field is dependent on the direction of current flow.

Materials

  1. 1.5V Battery
  2. Wire
  3. Compass

Procedure

  1. Place the compass on a horizontal surface.
  2. Connect the wire to both ends of the battery.
  3. Place the middle of the wire directly over the compass, parallel to the initial orientation of the needle.
  4. Observe the needle deflect to one direction.
  5. Now flip the wire over so the current flows in the opposite direction and place it over the compass again.
  6. The needle will deflect in the other direction.
  7. Additionally, you can place the compass on top of the wire now.

Science Explained

A current will carry with it its own magnetic field. The magnetic field lines form concentric circles around the wire so that the field points in one direction above the wire and the opposite direction below the wire. Using the right-hand grip rule, where one holds his hands as though he is gripping something with his thumb pointing in the direction of current flow, his fingers will curl in a way as to indicate the direction of the magnetic field. This is also the direction in which the needle deflects.

How Does Siphoning Work?

A siphon operates through the combined effects of gravity and air pressure, which work together to move liquid from a higher elevation to a lower one. Gravity is the primary force driving the flow, as it pulls the liquid from the higher container down through the siphon tube to the lower container. The liquid’s potential energy, due to its elevated position, is converted into kinetic energy as it flows downward.

Air pressure plays a crucial supporting role by maintaining the continuous flow of liquid. Atmospheric pressure on the liquid’s surface in the higher container pushes the liquid into the siphon tube. This pressure counteracts gravity’s pull that might otherwise cause the liquid to fall back into the higher container. As the liquid moves downwards, it creates a partial vacuum in the upper part of the tube, allowing atmospheric pressure to push more liquid into the tube, sustaining the flow.

Thus, a siphon can continue to operate as long as the outlet is lower than the liquid surface in the source container, the tube remains filled with liquid, and atmospheric pressure supports the flow.

Water in an Inverted Cup

This demonstration can be modified for use as a magic trick.

Materials:

  1. Glass of water
  2. Piece of cardboard that is larger than the mouth of the glass.

Procedure:

  1. Fill the glass up with water.
  2. Place the piece of cardboard over the mouth of the glass.
  3. Holding the cardboard against the mouth of the glass, invert the glass.
  4. Release the hand slowly.

Explanation

Water can remain in an inverted glass with the piece of cardboard underneath because atmospheric pressure is acting upward on the cardboard, holding it up together with the water. There is little air pressure within the g;ass, so the downward force acting on the cardboard is mainly the weight of the water, which is to the order of several newtons whereas atmospheric pressure exert an upward force of several thousand newtons.

Modification:

  1. Drill a small hole in a plastic cup, near the base.
  2. Seal the hole with your thumb and fill the cup with water.
  3. Place the cardboard over the mouth of the cup.
  4. Invert the cup together with the cardboard, while keeping your thumb over the hole.
  5. Using a magic word as the cue, shift your thumb slightly to allow a little air into the cup. This will cause the cardboard and water to fall. As the air pressure within the cup is equal to that of the atmosphere.

Crushing Can

We are usually unaware of the immense strength of the pressure due to the atmosphere around us, having taken it for granted. This demonstration will utilize atmospheric pressure to crush an aluminum can while introducing concepts such as the relationship between pressure and the amount of gas in a fixed volume.

Materials

  1. Empty aluminum drink can
  2. Pair of tongs
  3. Stove or bunsen burner
  4. Tank of water

Procedure Heating the Can over a Flame

  1. Put about a teaspoon of water into the drink can and heat it upright over the stove or Bunsen burner.
  2. Prepare a tank of water and place it nearby.
  3. When steam is seen to escape from the drink can, use the pair of tongs to grab the drink can, inverting it and placing it just slightly submerged into the tank so that the mouth of the can is sealed by the water.
  4. You should observe the can being crushed instantaneously.

Physics Principles Explained

Two physics principles work in tandem to crush the can. The cooling of the air within the can will reduce the internal pressure of the can as the movement of the air particles will slow down with reduced temperature.

At the same time, the sudden cooling will cause the water vapour in the can that exists at just slightly above 100°C to revert to its liquid state, greatly reducing the amount of gases inside the can.

As air pressure depends on both the kinetic energies and amount of particles within the system, it is significantly reduced. Atmospheric pressure, being stronger than the internal pressure, will cause the can to implode.

Measuring Speed of Sound

Outline for Measuring the Speed of Sound Using a Tuning Fork and a Hollow Pipe Submerged in Water:

  1. Equipment Setup:
    • Obtain a tuning fork of known frequency and a hollow pipe that can be partially submerged in a column of water.
    • The pipe should be open at the top and closed at the bottom by the water surface.
  2. Strike the Tuning Fork:
    • Strike the tuning fork on a soft surface to make it vibrate. This produces a sound wave of a specific frequency, known as the fundamental frequency of the tuning fork.
  3. Submerge the Hollow Pipe:
    • Submerge the hollow pipe vertically in a large container filled with water. The length of the air column inside the pipe can be adjusted by raising or lowering the pipe in the water.
  4. Create Resonance:
    • Hold the vibrating tuning fork above the open end of the pipe. Slowly raise or lower the pipe in the water while listening for the loudest sound, which indicates resonance.
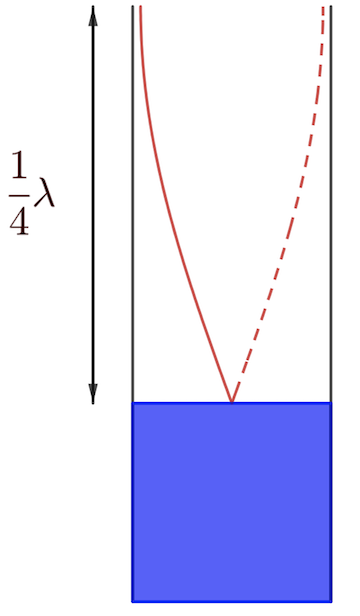
    • Resonance occurs when the length of the air column in the pipe is such that it forms a standing wave with the frequency of the tuning fork. This usually happens when the length of the air column is a quarter of the wavelength of the sound wave.
  5. Measure the Air Column Length:
    • When resonance is achieved (indicated by a significant increase in sound amplitude), measure the length of the air column from the water surface to the top of the pipe. This length corresponds to one-quarter of the wavelength of the sound wave in air.
  6. Calculate the Wavelength:
    • Multiply the measured length by 4 to determine the wavelength of the sound wave.
  7. Determine the Speed of Sound:
    • Use the formula Speed of Sound = Frequency × Wavelength ($v = f\lambda$) to calculate the speed of sound in air. The frequency is given by the tuning fork, and the wavelength is obtained from the previous step.

Explanation:

The speed of sound in air can be measured using the relationship between the frequency of the sound wave and its wavelength, which are connected by the speed of sound. When the tuning fork vibrates, it creates sound waves that travel through the air. When these waves enter the hollow pipe, they reflect off the water surface, and at certain lengths, they create a resonance condition, amplifying the sound. The resonant length corresponds to one-quarter of the wavelength because the pipe is effectively closed at the bottom (by the water), forming a node at the water surface and an antinode at the open end. By measuring this length and knowing the frequency of the tuning fork, the speed of sound can be calculated.