Pressure Nodes and Antinodes

Access in full screen here: https://www.geogebra.org/m/xbknrstt

I modified the progressive sound wave interactive into a stationary wave version.

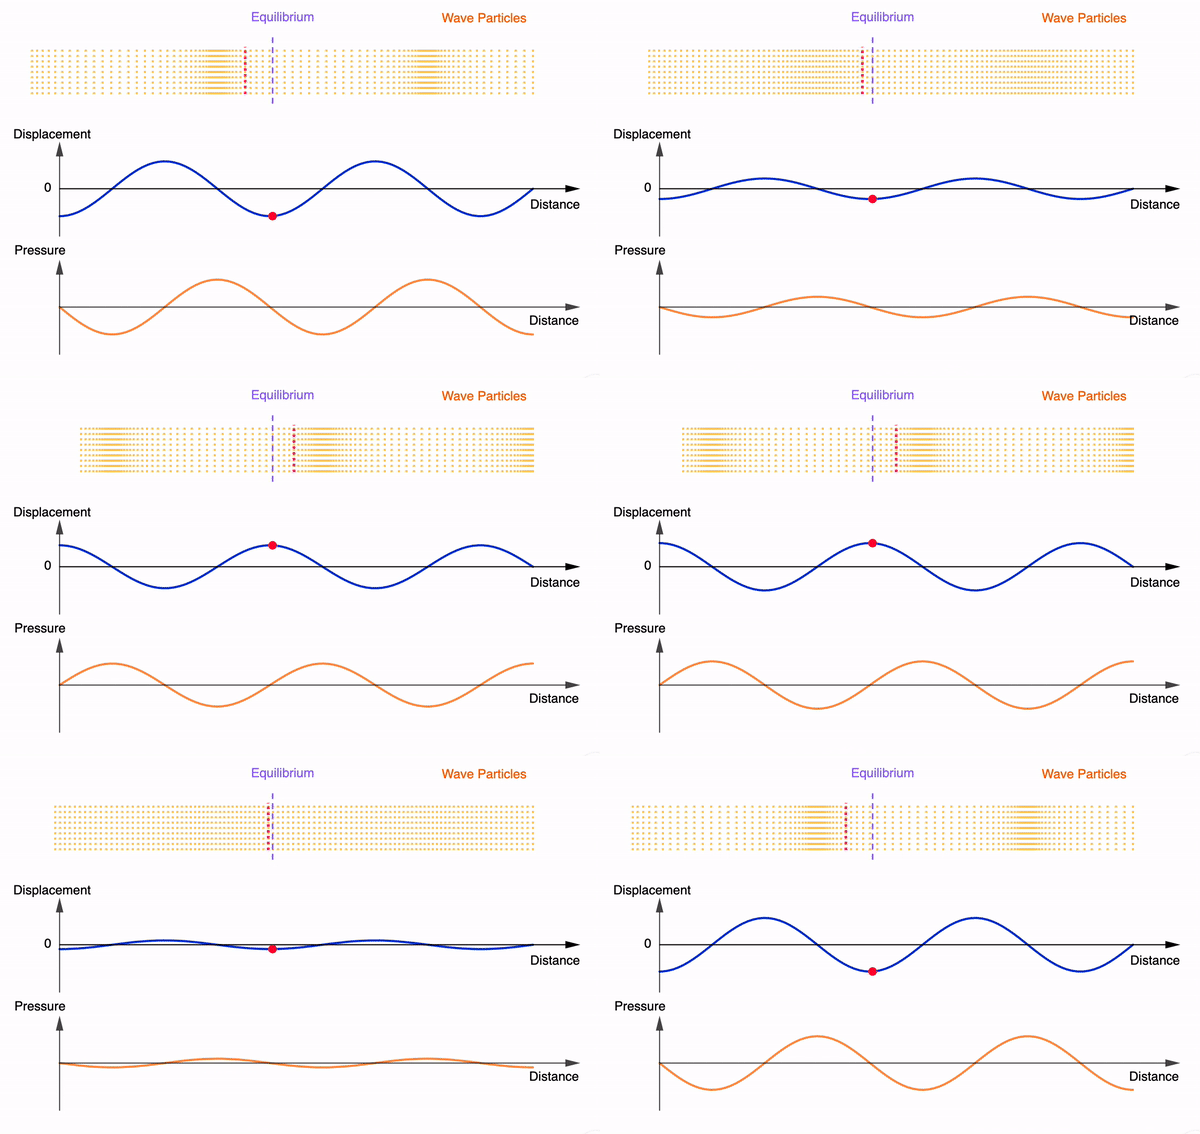
This allows students to visualise the movement of particles about a displacement node to understand why pressure antinodes are found there.

Usually I will pose this question to students: where would a microphone pick up the loudest sound in a stationary sound wave? Invariantly, students will say it is at the antinode. When asked to clarify if it is the displacement antinode or pressure antinode, students then become uncertain.

According to Young & Geller (2007), College Physics 8th Edition, Pearson Education Inc. (pg 385), microphones and similar devices usually sense pressure variations and not displacements. In other words, the position within a stationary sound wave at which the loudest sound is picked up is at the displacement nodes which are the pressure antinodes.

For an alternative animation, check out Daniel Russell’s.

For embedding into SLS, please use the following code:

<iframe scrolling="no" title="Stationary Sound Wave (Displacement and Pressure)" src="https://www.geogebra.org/material/iframe/id/xbknrstt/width/640/height/480/border/888888/sfsb/true/smb/false/stb/false/stbh/false/ai/false/asb/false/sri/false/rc/false/ld/false/sdz/true/ctl/false" width="640px" height="480px" style="border:0px;"> </iframe>
This animation gif file demonstrates the movement of particles in a stationary sound wave, displaying the changing displacement-distance and pressure-distance graphs simultaneously. It can be inserted into slides and websites. Free to use!

Videos on Series and Parallel Bulbs

These are two videos that I made on series and parallel bulbs. The second video is specially made to highlight the increase in brightness of the remaining bulbs when one or more bulbs is removed from its socket.

What students will learn in O levels is that the brightness of the bulbs will not change as the potential difference is a constant, being the emf itself.

Based on the conflict between what is taught and what is observed, students will be led to discuss the reason why.

If anyone is interested in getting the demonstration kit, do check out Funlearners.com.

Hidden Circuits Interactive

I made this interactive tool using javascript for the teaching of DC circuits for integration with SLS as part of the IP4 Physics blended learning experience in the upcoming weeks.

The intention of this interactive is for students to do a preliminary inquiry activity to exercise what they learnt about series and parallel circuits. They can be tasked to draw out what they think the circuit diagram will be like, either on Nearpod or SLS.

Students can even notice the differences in brightness under different conditions. Questions can be designed around this as well.

Previously we used to construct little boxes with wires hidden underneath. However, due to wear and tear and with Covid-19’s safe management measures, a digital version that can be accessed via the students’ mobile devices is more suitable.

Light bulb image is adapted from Good Ware from www.flaticon.com
Switch image is adapted from Those Icons from www.flaticon.com

For a direct link to this interactive, please go to: https://www.physicslens.com/wp-content/uploads/2022/04/index.html (updated link)

To obtain the zip file for upload into SLS as an interactive media object, click here.

AC Power with Half-Wave Rectification

As a means of visualising what happens to the potential difference, current and power dissipated in an alternating current circuit with half-wave rectification, I have created the interactive applet with all 3 graphs next to each other.

It should be easy for students to see that with half-wave rectification, the power dissipated is half that of a normal a.c. supply with the same peak p.d. and current.